Showing posts with label recipe. Show all posts

Friday, November 05, 2021

Vegetable Soup

 We were obviously needing healthy foods.  Our bodies were screaming for it.  It was obvious when we went grocery shopping.  Our unplanned purchases were all either fruit or vegetables.    We were craving healthy foods and we listened.   We planned to make a big pot of vegetable soup and boy was it delicious!

Vegetable Soup  

For a printable copy click here

1 lb Beef -Either a roast or stew meat (If it is stew meat just make sure to cook it slow and long for  lb tenderness of your meat)  

1 lrg can Diced Tomataoes (Italian seasoned)

6-8 potatoes, peeled and diced 

4-8 cups of Beef Broth

3 pounds frozen vegetables 

Salt and Pepper to taste


1.  Cook the beef until tender.   Cut the beef into bite sized pieces.   

2. In large pan (or crockpot) place beef, potatoes, tomatoes and frozen vegetables, salt and pepper.  Add beef broth until broth covers vegetables.  You will want the broth to be a half inch to an inch above the vegetables.  Adjust the amount of broth according to the amount of vegetables that were added and to your individual preferences.

3.  Cook on med-high for 45 minutes on the stove (in crockpot, cook for 6 hours low)

4.  Serve and Enjoy

This soup hit the spot!  The weather has turned cooler and the vegetables were exactly what my body was demanding!   A win win!

For More Recipes click here


Thursday, March 25, 2021

Funeral Potatoes

 Seriously, they are called funeral potatoes.  What a morbid name for something so delicious!   Upon reading about this recipe, the name came from the tradition of taking a dish to a funeral or to the family of the deceased.  This is one that many people used for that tradition as it is tasty, reheats well and is a crowd pleaser.

It is not exactly healthy...but it is good!  And as we know....all things can be had in moderation!


Funeral Potatoes

Ingredients

1/3 cup butter, melted

2 cups sour cream

1 can cream of chicken soup 

1 tsp salt

1 tsp garlic powder

2 cups shredded cheddar cheese

24 ounces frozen diced potatoes (thawed.....use cubed or diced, not shredded)

3 cups cornflakes, slightly crushed

1/2 cup butter, melted


Instructions

1.  Preheat the oven to 35o degrees.

2. In a large mixing bowl, combine the 1/3 cup melted butter, sour cream, cream of chicken soup, salt and garlic powder.

3.  POur the mixture into a greased 9x13 pan.  

4.  IN a medium mixing bowl, combine the 1/2 cup melted butter and crushed cornflakes.  Stir until the corn flakes are coated in butter.

5.  Spoon the cornflake mixture over the potatoes.

6.  Bake for 45 minutes.


For a printable version of this recipe  https://www.kulinarian.com/recipes/funeral-potatoes/

Monday, September 07, 2020

Broccoli Chicken Rice Crockpot Casserole

 I love using my crock pot.  I somehow always seem to forget about it though!  But not this week!  This week we dined on the broccoli chicken rice crockpot casserole.  


This recipe is super easy.  It calls for a 

1pound of chicken (cut into bite size pieces)

5 cups of bite sized pieces of broccoli

 1 can cream of chicken soup

 1 can cream of celery soup

2 cups of rice

 1 cup of shredded cheddar cheese 

3-4 cups of chicken broth (I start with 3 and add more if it looks too dry as it is cooking)

Dump it all in the crockpot, put the crockpot on low and let it cook for 6 hours.  And Voila'  a delicious meal!!!!


For a printable recipe you can click here.

Monday, August 24, 2020

Broccoli Salad

A cool refreshing salad for the summer months


Broccoli Salad

In a large bowl combine:

6 cups fresh broccoli florets

1 can (8oz) sliced water chesnuts, drained

½ cup dried cranberries

¼ cup chopped red onion


In a small bowl whisk together

¾ cup mayo

¾ cup yogurt

1 ½ tsp cider vinegar

1 ½ tsp sugar

1 ½ tsp Dijon mustard

¼ tsp salt

1/8 tsp pepper

Pour dressing/liquid over broccoli and toss to coat.


Just before serving sprinkle with ¼ cup slivered almonds (optional)


Serving Size ½ cup

Per serving (without the almonds)

Cal 51.8

Fat 0.5

Sat Fat 0.2

Poly Fat 0.1

Mono fat 0.1

Chol 0.9

Dietary Fiber 1.8

Sugars 5.6

Protein 2.6


Alternate versions:
Use raisins instead of cranberries

Different dressing

 1 cup miracle whip

1 tbs vinegar

1/3 cup sugar


Click here for a printable copy of this Broccoli Salad Recipe.

Wednesday, August 05, 2020

Summer Salad

One of our favorite dishes in the summer is this summer Salad.  It is filled with nutritious beans and is  healthy, light and very filling.


15 ounce can black beans, rinsed and drained
15 oz can pinto beans , rinsed and drained
15 oz can kidney beans, rinsed and drained
Rinsed and drained , rinsed and drained

15 oz bag frozen sweet corn kernels
small chopped red onion
2 garlic cloves, chopped
2-3 chopped bell peppers (different colors make it prettier but not necessary)

Mix all of the above ingredients together in a large bowl

THe Dressing

1 tbs ground pepper
1 tsp salt
1/4 cup canola oil
1/2 cup red wine vinegar
The juice of two limes

Whisk all of the ingredients for the dressing together and pour over the vegetables.  This can be eaten immediately, but the taste will be enhanced after they sit and marinate together for a bit.

serves 10
Cal 245.4
total fat 6.5
chol 0
sodium 192.4
total carbs 39.6
fiber 11.4
Sugars 1.9
protein 10.6

Click here for  a printable recipe of this Summer Bean Salad.


Sunday, March 22, 2020

My absolute Favorite!

On of my absolute favorite dishes to make is a Breakfast Casserole.  Years ago a chain restaurant used to have a breakfast casserole on their menu.  It was delicious....but it was hit or miss if they had it.  You see, they only had a certain number made and when they were gone for the day, they were gone.  It was always a good day when I got there and found that they were still serving the breakfast casserole.  But sadly, they took the item off the menu and I was left without my favorite dish.    Thus began my quest to find a recipe!  It took a while but finally I found a recipe.  This recipe has been one of my favorites for many years now.  It is easy to prepare, is filling and remains a favorite dish of mine.

When I give you the ingredient list, I will be giving measurements.  However, I hardly ever measure anything and just throw it together.  It works every time....like a charm!


My mouth is watering even as I type this out!   So without further ado, I give you my favorite meal!

Breakfast Casserole

Ingredients:
1/4 cup butter, melted
1 cup croutons
1 cup shredded cheddar cheese
3 eggs
1 tsp ground mustard
2 tbs milk
breakfast meat, pre-cooked and but into bite size pieces (optional)

Directions:

1.  In a round baking dish place melted butter.  Spread croutons over the melted butter.
2.  Top croutons with cheddar cheese.  If adding meat, sprinkle meat over the cheese and croutons.
3.  In a small bowl mix eggs, dry mustard and milk.  Pour egg mixture over cheese. 
4.  Cover casserole dish and place in the refrigerator overnight/for 8 hours.
5.  Remove casserole dish from the refrigerator and preheat  oven to 350 degrees.
6. Bake for 30 minutes until cooked through and eggs are set.
7.  Let stand for 5 minutes before serving.

I'm telling you....are you drooling yet??  This dish is SOOOO good that you need to run to your kitchen and make some Breakfast Casserole right now!  (ok, maybe not right now...but you get the point!)


Wednesday, March 18, 2020

Baked Portobello Parmesan

I have never been a huge fan of mushrooms but as we have tried to segue into a more meatless existence I have found myself coming up against more and more mushroom base recipes.  I decided to give mushrooms a REAL try.  I started small and had a recipe that I was able to chop them up quite fine.  And guess what?  I survived!   I got a bit braver and decided to go all in.  I decided to make portobello Parmesan.  I wasn't sure how I was going to handle this recipe....it is ALL mushroom!  But I knew that jason would like it, so I forged ahead!   Jason loves this recipe and I  have to agree, it's not too bad.....for mushrooms! (hahahah nope I'm not to the point of loving mushrooms ....yet....but I am really trying to see if I learn to like them a bit more....and for me it's not a taste issue...it is a texture issue!)

Portobello Parmesan

Ingredients

1 Portobello Caps
1/4 cup marinara
1 slice of mozarella cheese
1 tbs parmesan cheese
2 tbs olive oil

Directions
1.  Preheat oven to 350 degrees
2.  Wash mushrooms and allow to dry
3.  Heat olive oil in a large skillet.  Brown portobello caps on each side, allowing to cook until just starting to get tender
4.   Spoon a small amount of marinara sauce in the bottom of a baking dish. (You can use individual dishes or if you are making multiple portobello caps, you can place all of your portobello caps in one large baking dish
5.  Place portobello caps in baking dish upside down. Spoon remaining marinara sauce over the mushroom. Cover the sauce with the slice of cheese and sprinkle the parmesan cheese over the top. 
6.  Bake for about 10 minutes...or until sauce bubbling and cheese if golden.
7.  Serve immediately.


Wednesday, March 11, 2020

Roasted Broccoli

No let me be clear about this.  I have never been a big fan of broccoli.  I could 'stomach it' on occasion, simple because I knew it was so healthy!  Yeah, not  raving review for broccoli.  However, a few months ago I decided to try to try a different way to prepare the broccoli.  OH. MY. WORD.  I am in love!  There is no more broccoli of doom.....it is broccoli of yum!

So I decided to share this recipe with you.....so that I can share the love!
Ingredients
Broccoli (enough for two)
1 tbs olive oil
1 tbs garlic powder (to taste)
2 tbs Parmesan Cheese

Directions
1.  Wash Broccoli and cut into bite size pieces and place into a bowl
2.  Drizzle broccoli with Olive Oil.  Sprinkle cheese and garlic powder over the broccoli.  Stir to coat.
3.  Place broccoli in a baking dish that has been sprayed with a cooking spray.
4.  Bake at 375 for about 20 minutes or until the broccoli is crispy and lightly browned.
5.  Serve immediately and enjoy.

I hope you enjoy this recipe as much as we have!  Roasted Broccoli......a delicious side dish!  It truly is delicious!


Friday, February 21, 2020

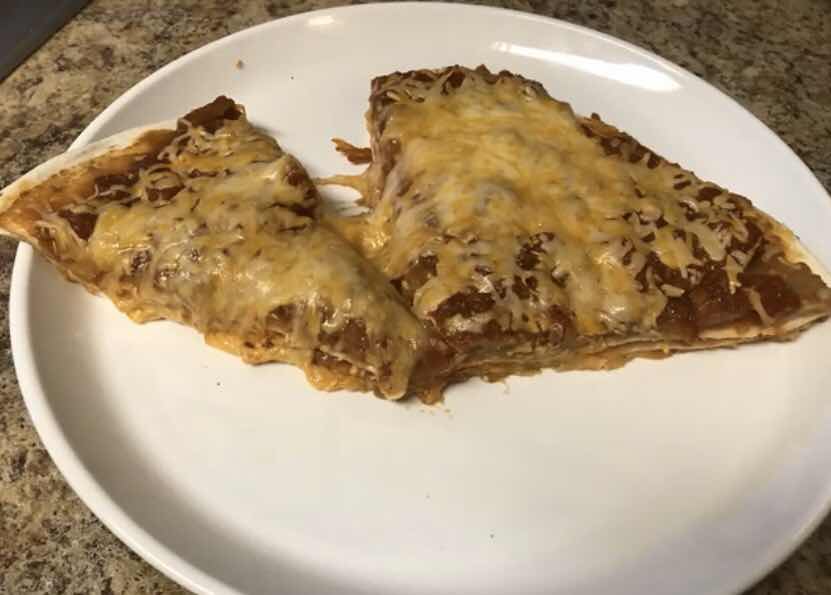
Mexican pizza

Sometimes in life we need that ultra quick meal to get on the table.  It might be because you are just stone tired and can’t fathom making anything complicated.  Or it just might be that life got in the way and you have no time.  No matter the reason, this recipe is the perfect recipe for a quick meal to throw together.  Even better, it is delicious.

Just the other night I made this recipe and Jason asked me what we were having.  I answered “Mexican Pizza” and he asked skeptically, “Do I like it?”.  I assured him that he had told me he liked it before.  A few minutes later he walked into the kitchen and saw what I was preparing and his reaction had me grinning.  “Oh yeah!,”  He happily exclaimed.   “I remember this meal now!  I like this!” 

So you see….winner!  What’s better, I can have this meal prepped and ready for the oven in about 5-10 minutes….TOPS!  


Mexican Pizza

Ingredients

3 flour tortilla
1 can (14 oz) refried beans
2 cups fat free salsa
2 cups Shredded Cheddar cheese

Directions:
1.        Preheat oven to 350 degrees.
2.       On a baking sheet place one flour tortilla. 
3.        Spread 1/3 of refried beans over the tortilla.  Cover the beans with 1/3 of the salsa and top with 1/3 of the cheese. (making sure to get beans, salsa and cheese completely to the edges)
4.       Repeat with two more layers.
5.       Bake for 15-20 minutes or until the cheese is bubbly and golden.
6.       Serve immediately.   Can be served with Sour cream and salsa (I also have used taco sauce)

You can add onions, green peppers,corn or any veggies to your beans….just saute them in a pan before adding them to the beans.

Spreading the refried beans can be easier if you heat them in a pan.  (I am usually tired and strapped for time so chose to just spread them straight out of the can!)


Enjoy this recipe…it really can’t get any easier or more delicious!  

For more recipes, visit my recipe page!  For a printable version of this recipe, you can click here.  


Friday, February 14, 2020

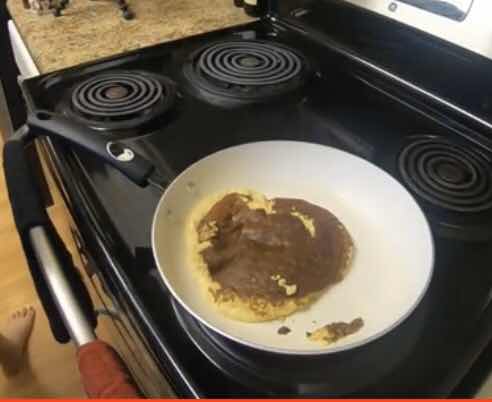
Banana pancakes

Sometimes ideas come to you randomly and out of the blue.  This is exactly what happened a few weeks ago to me.    It came in the middle of the day, and not even in themiddle of a conversation.   I received a text from my friend Shantel.  Shantel and I do text each other frequently, so receiving a text was not that random.  However, the text read, “You need to try 4 ingredient banana pancakes for a foodie Friday video on Youtube.”   Yeah, I was hooked just from that line!

Of course I made the pancakes. (although I now add a fifth ingredient!)  Of course I made a video!   And now it is time to share with you!  It’s easy, tasty and choke full of nutrition!

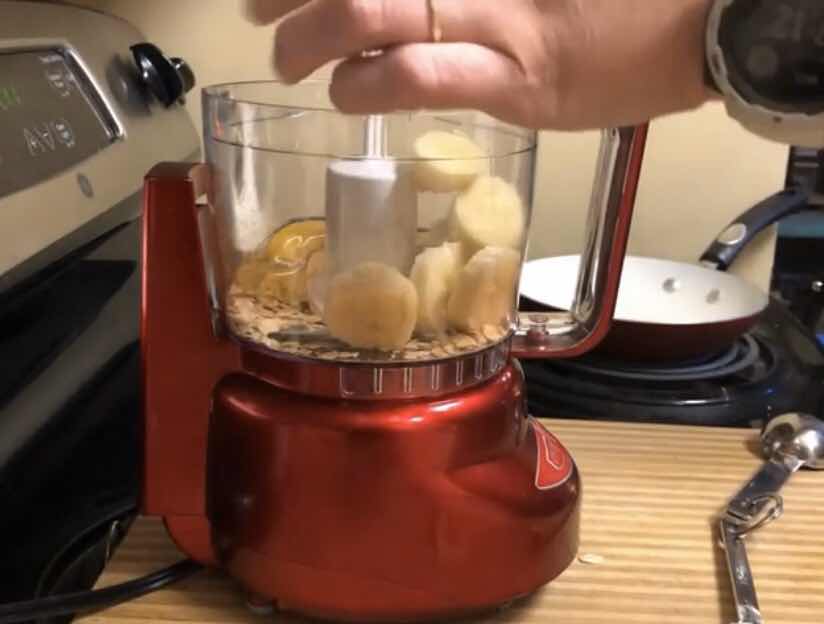
BANANA PANCAKES
Ingredients
1 banana
1 egg
¼ cup oatmeal, uncooked
¼ tsp baking powder
Dash of cinnamon (optional)

Instructions:
1.        Add all ingredients to a food processor or blender and blend until ingredients are well incorporated (the longer you blend the more the oatmeal will break up and create a smoother batter).
2.       Heat a skillet on the stove.  Spray with non-stick spray (I use an Olive Oil spray).
3.       Pour a generous amount of the batter into the pan and allow to cook on one side until golden brown (large bubbles will appear on the top to help indicate that it is ready to turn)
4.       Flip the pancake and cook the other side until golden brown.
5.       Eat immediately.  
I have eaten these with butter and maple syrup. I have had these with butter and chocolate syrup.  And oh my, I just thought about maybe trying them with peanut butter!  That sounds delicious also doesn’t it?   Oh the possibilities!

Thank you Shantel for a winning recipe!  These are as delicious as you said in your text!

For more recipes, visit my recipe page!

Friday, January 10, 2020

Foodie Friday: Baked Zucchini Parmesan

Zucchini, the vegetable of the summer.  It seems as if zucchini is super plentiful in the summer, to the extent that people are sometimes inundated with zucchini.  This happened to me a few years back.  I was determined to let NO produce from my garden go to waste.   I scoured and searched for different ways to prepare and use zucchini and I stumbled upon Baked Zucchini Parmesan.

What a find.  This recipe quickly became one of my all-time favorite ways to prepare zucchini.   No, not one of my all- time favorite ways.  This is the BEST way to make zucchini.  The light breading that coats the outside gives the vegetable the bit of a crunch but gives way to the soft and tender flesh of the zucchini.  The flavor of the parmesan bursts to life in your mouth.  This is truly heaven!
When I was young my mom once told me that making homemade onion rings was a labor of love.  We loved them and she loved us, so she took the time to bread the onions herself.  Every time I make Baked Zucchini Parmesan I think about the statement.  You see, they are a labor of love.  And while Jason knows that they baked zucchini parmesan is breaded and takes a few minutes of my time, so he rarely asks for them.  I quickly offer them because they are a labor of love.  I would definitely make them for him because I love him.  BUT, they are a labor of love for me also because I really do love these delicious bites of goodness!  I may think to myself for a hot second “I don’t want to take the time” but within seconds I am slicing and breading up my zucchini!  
I’m telling you, they really are that good!   Now honestly, if you wanted to you could mix the breadcrumbs and parmesan together and bread them as normal and fry them in a skillet of vegetable oil.  And admittedly, they are good that way but why bother?  That little dot of butter on top of the baked ones gives it the same flavor and taste and is so much easier!  

So here goes, I give to you the perfect Zucchini Recipe!

2 zucchini (medium) 
1 cup of plain breadcrumbs
1 egg
1 tbs butter
1/4 cup grated parmesan cheese

1. Preheat oven to 350 degrees.  Spray a cookie sheet with a non stick spray.
2.  Wash and trim the ends from the zucchini.  Slice the zucchini into 1/4 inch slices.
3.   In one bowl place bread crumbs.  In a separate bowl whip egg slightly with a fork to break the yolk.
4.   Doing one zucchini slice at a time dip first into the egg and then dip into the breadcrumbs to coat and place on the cookie sheet.  Continue until all slices of zucchini are breaded.
5.  Using the butter cut off a small sliver and place on the top of each zucchini disk.  Sprinkle the parmesan cheese over the top of the breaded zucchini
6.  Place in the preheated oven for 20 minutes or until the zucchini slices are golden brown.

For more recipes, visit my recipe page!

Friday, January 03, 2020

Foodie Friday: Red Beans and Rice

With the cooler (ok cold) weather upon us, it was time to dig deep into my recipes and come up with a hearty, warm and filling meal.  At the same time, we had decided to start to incorporate more vegetarian meals into our daily life.  I am not used to creating a vegetarian meal.  I have almost always cooked in a very basic ‘meat and potatoes’ style.  What in the world was I going to come up with? 

I was up for the challenge!   I scoured the internet and I scoured cookbooks and an idea began to develop in my head.  I was going to make Red Beans and Rice and I was going to utilize my instant pot!   Oh my word, my mouth was drooling as I came up with my plan and recipe!

This recipe is amazing because it utilizes only 5 simple ingredients!  Yes, only five!   In fact, these ingredients are so simple that most kitchens will have the items in their cupboards as basic staple items!  I absolutely love recipes that I can literally say that I have no food in the house but then create a full meal!  This is one of those recipes that allow me to do it!

Even better?  This recipe uses the Instant Pot so it fills the need for a super quick and easy meal on those busy nights when the last thing you want to do is cook.  This meal is really that easy.  The prep work takes 5 minutes…MAYBE.  And then you walk away and 25 minutes later you have dinner.  Can it get any better than that for a home cooked meal?   

Oh yeah, it can!   It’s also delicious!

The flavor in this Red Beans and Rice recipe comes from one ingredient, salsa.  The control over the heat and flavor of this dish is all centered on the salsa that the cook uses for as an ingredient.  Personally, we like our foods a bit on the spicy and hot side, so I used a hot salsa that we frequently get.  It has great flavor and I knew that it would be a great base for this dish.   But if you like things less spicy, it is perfectly fine to choose a medium or mild salsa.    This is a personal preference,  chose your salsa based on your taste buds!

In our house, the leftovers from this dish are quickly consumed!  This has definitely become a new favorite!

Red Beans and Rice
Ingredients
·    1 1/4 cup dry Red Kidney Beans
·    1 1/2 cup dry Brown Rice
·    1 cup Salsa
·    3 cups Vegetable Broth
·    2 cups Water
Instructions

·    Add the dried Beans and Rice to the bottom of your Instant Pot.
·    Gently pour the Vegetable Broth and Water over the Rice and Beans, then give everything a good stir.
·    Next, add the Salsa into the pot. Do not mix!
·    Close the Instant Pot, set the valve to Sealing, and use the Manual Mode to cook on High for 25 Minutes.
·    Once the cook time finishes, let the Instant Pot release pressure for an additional 10 Minutes (leave the “Keep Warm” feature on).
·    Finally, move the valve from Sealing to Venting to release all remaining pressure, and serve the Beans and Rice warm. Garnish with anything you desire!

For more recipes, visit my recipe page!


Thursday, May 09, 2013

Hot Dog!

I was so happy with my weight the last few days (because it was looking like I was going to hit my 30 pounds gone this year mark...because I was there, just waiting for the official weigh day) and then this morning I stepped on the scales and voila, I was right back up 2 pounds.  What the haymarket?????  Seriously?  I am trying to shrug it off.  I KNOW I woke up once or twice in the middle of the night thirsty and was too darn comfy to get up and get a drink.  Waking up thirsty is not a good sign, so hopefully it really is just water retention.  (and yes, when I wake up thirsty my weight is usually up...but not two stinkin' pounds!)  Oh  well....shrugging it off.  I'm healthier than I have been in a while.  I'm happier and more active than I have been in a while.  (Yes, for some reason drowning my sorrows in exercise really is working....the issues are there and  they still depress the living snot out of me...but I just ignore them and go for a run...or go for a ride...or go to zumba.  No worries then...all I can think of then is pushing myself just a little harder).   I saw a negative on the scale today and I'm in no danger of quitting, but there were times in the past that I would have quit just because it hurts and doesn't make sense.  No more....I'm still truckin' onward!

I got up and made breakfast for us. I made breakfast pizza which is supper yummy.  It is a bit high in calories (300 calories  slice)  but I wasn't worried.  You see, I had looked at the weather and decided that I could get in a ride this morning before the weather went south again.

I laced up my biking shoes (oops ratcheted them up as they dont' have laces) carted my bike out the door and headed down the road.  My butt hit the saddle and I wanted to scream.  OUCH!  Apparently the nether regions had not yet had time to recover fully from my last ride.  I briefly thought about cutting my ride from 10 miles down to 5.  But that is SOOOOO cheating and I knew it would ultimately lead me to feeling as if I failed...and honestly, it would have been a failure.  I did 10 on my last ride, I can do 10 today!  I pushed on!  I did the same loop that I did my last ride.   After my last ride my brother asked me how may hills I had to walk.  I honestly answered with an indignanat "none!" (who does he think I am???  Ok, maybe he didn't get the memo that there is a new MaryFran in town!)   I do have to admit though that I stopped three times for a breather/drink.  Yes, I clipped out and feet were on the ground for a breather for no reason other than I wanted to stop. (there was probably two more times that I clipped out that ride due to traffic/stop signs).    I am proud to announce though that today the only time I clipped out of my pedals was when I was crossing a major road.  (the traffic was with me through the other stop signs and turns)   I thought it would be advantagous to clip out and wait until a lull in the traffic...silly me!.  Otherwise, I stopped for nothing.  I may have gone slow up the hills.  I may have crept (the refrain a turtle sludging through peanut butter comes to the forefront of my mind again.....) through some stretches.  But I did it.   The ride was still brutal.  My hands went a bit numb and my arms are just sore.  I'm just plain and simple am used to riding my Trek Nav and well this is different.  I'm trying to loosen up my arms because that helps them, but then my back tenses up.  I know it's just a thing of getting used to a road bike so I'm not too concerned.  Besides, I WILL conquer it!  :-) Anyway, I got home, took the obligatory picture for my blog and called the ride complete. I carted the bike inside.

   I had grand plans to head back out for a run....because well, maybe I'm a glutton for punishment....or maybe I'm just plain and simple nuts.  But after the planned 10 minute break my legs felt heavy and I felt as if there was no way I could even build up to a trot much less a run.    If I waited a bit longer I could probably do it, but I do have a job (drat) and that means I must have time to shower and eat lunch before arriving ready to work at noon.   I walk with Sherry tonight when I get off of work.  Maybe I can try to sneak in a quick jog after we walk.....or if it's stormy and we cancel I'll go to the gym and run on the treadmill (gah, I hate running on the treadmill).    Even if I don't get in my run tonight, i'm not worried.  My bike ride is sufficient exercise for the day...anything else is just for my own mental benefit.    My HR monitor shows that I earned 666 calories.  That's not too shabby if I do say so myself!  :-)  (and yes, for those of you who are curious...I ate TWO pieces of breakfast pizza this morning!!!!!  So I simply burned off my breakfast!)

Where does my title Hot Dog come into play?   Really it doesn't.  I just didn't know what to title this blog post...I was toying with "jingle bells' as a title!  Although there was a little yappy dog that chased me down Sharpsburg Pike on my bike today and it certainly thought it was a 'hot dog'.